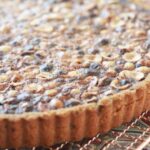
Hazelnut Tart (Gluten-Free)
Adapted from Fine Cooking
- Prep Time: 15 minutes
- Cook Time: 1 hour
- Total Time: 1 hour 45 minutes
- Yield: Serves 12
- Category: Dessert
- Method: Baking
- Cuisine: American
- Diet: Gluten Free
Ingredients
Units
For the Crust:
- 2 cups almond flour
- 4 tablespoons coconut flour
- 1/2 teaspoon unflavored grass-fed gelatin
- 1/4 teaspoon Celtic sea salt
- 1 teaspoon coconut sugar
- 8 tablespoons unsalted butter, cold, cut into tablespoons
For the Filling:
- 1 1/2 cups soaked and dehydrated hazelnuts (I use this recipe and omit the maple syrup), chopped
- 12 tablespoons unsalted butter, melted and cooled
- 3 large eggs
- 3 large egg yolks
- 1/2 cup coconut sugar
- 1 cup raw honey
- 1 teaspoon Celtic sea salt
- 2 tablespoons heavy cream or coconut cream
- 1 tablespoon coconut flour
- 1 teaspoon vanilla extract
Instructions
- Prepare the crust: Place the almond flour, 4 tablespoons coconut flour, gelatin, ¼ teaspoon sea salt and 1 teaspoon coconut sugar into the bowl of a food processor. Pulse 2-3 times to combine. Add the 8 tablespoons cold butter to the flour mixture and pulse for eight 1-second pulses. Then leave the processor on until the dough forms into a ball. (If the dough is crumbly, add 1-2 tablespoons of water.) Press the dough on the bottom and up the sides of a 10-inch tart pan. Place in the refrigerator to chill for 30 minutes.
- Preheat the oven to 350ºF and adjust the rack to the middle position. Cover the chilled crust with a piece of parchment paper. Pour pie weights or beans onto the parchment to weigh the paper down. Place the tart pan on a baking sheet and put into the oven. Bake the crust for 10 minutes, remove the pie weights and parchment and then bake for an additional 10-12 minutes, until the crust just begins turning golden brown.
- Prepare the filling: Pour the hazelnuts over the pre-baked pie crust and spread into an even layer. Whisk the eggs, yolks, ½ cup coconut sugar, honey, 1 teaspoon salt, cream, 1 tablespoon coconut flour and vanilla until combined. Pour the egg mixture over the hazelnuts. Bake the tart for 30-35 minutes, until the filling turns golden brown. Cool completely. Serve at room temperature.
- Note: I only test the recipes on my site with the listed ingredients and measurements. If you would like to try a substitution, you are welcome to share what you used and how it turned out in the comments below. Thanks!
Find it online: https://deliciouslyorganic.net/hazelnut-tart-grain-free/