Deliciously Organic - Carrie Korem, FNTP

Healthy recipes, nutrition and thyroid disease information written by Carrie Korem, FNTP

  • Start Here
  • The Blog
  • Thyroid Disease
  • Recipes
  • Cookbooks
    • The Grain-Free Family Table
    • Deliciously Organic
  • Supplements
  • The Shop
    • Cart
    • Checkout
    • My Account
  • Members Only:
  • Work With Me
  • Thyroid Course
  • Adrenal
  • Meal Plans

February 2, 2016

Homemade Thin Mints (Grain-Free, Paleo)

388 shares
  • Share
  • Tweet
Jump to Recipe

Thin Mints are one of my favorite cookies, and this grain-free version tastes just as good as the original!

Thin Mints are delicious, but they contain lots of unhealthy ingredients.

Here’s a short list of some of the ingredients:
GMO Sugar
High Fructose Corn Syrup
Partially Hydrogenated Oils
White Flour
Artificial Flavors
Class 4 Caramel Color

To avoid these harmful ingredients (but still get our Thin Mint fix!) I decided to clean them up a bit and give you a recipe for Grain-Free Thin Mints.

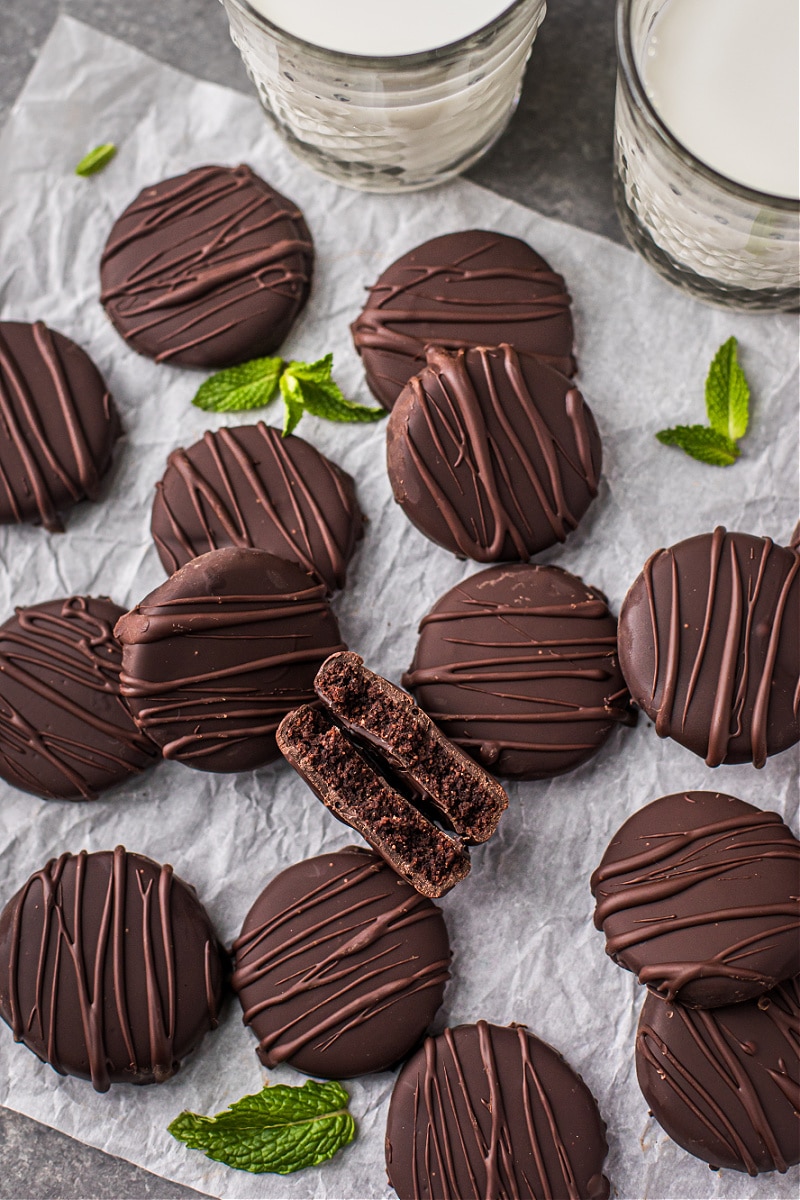
I baked the cookies just a tad longer than normal to help get them a bit crispier. We also put a batch in the fridge and freezer and yep, they taste like the real thing!

Here are some more homemade girl scout cookie recipes you might enjoy!
Homemade Grain-Free Samoas
Grain-Free Tagalongs
Grain-Free Do-si-dos

Print

Homemade Thin Mints Recipe (Grain-Free, Paleo)

Print Recipe
Pin Recipe

5 Stars 4 Stars 3 Stars 2 Stars 1 Star

No reviews

  • Prep Time: 35 minutes
  • Cook Time: 15 minutes
  • Total Time: 1 hour 5 minutes
  • Yield: Makes about 2 dozen cookies
  • Category: Dessert
  • Diet: Gluten Free

Ingredients

  • 1 cup almond flour
  • 2 tablespoons coconut flour
  • 1/2 cup cocoa powder, plus additional for sprinkling
  • 1/2 teaspoon Celtic sea salt
  • 1/2 cup coconut sugar
  • 6 tablespoons unsalted butter (or 5 tablespoons palm shortening), room temperature
  • 1 large egg plus 1 egg yolk
  • 10 drops peppermint essential oil
  • 16 ounces semi-sweet chocolate (I used Enjoy Life Chocolate Chips)

Instructions

  1. Place almond flour, coconut flour, cocoa powder and salt in a medium bowl and whisk until combined.
  2. Place the coconut sugar and butter in the bowl of a standing mixer with beater attached. Beat on medium-high for 4-5 minutes until lighter in color and fluffy. Beat in the egg and the yolk and then the peppermint oil. With mixer on low, slowly add the flour mixture and mix until incorporated.
  3. Place a piece of parchment paper on the counter and sprinkle with cocoa powder. Place the dough on top of the parchment, top with another piece of parchment and roll the dough using a rolling pin until it’s ¼-inch thick. Place the rolled out dough and parchment on a baking sheet and place in the fridge for 15 minutes (this will make the cookies easier to cut).
  4. Preheat the oven to 350ºF and adjust the rack to the middle position.
  5. Remove the dough from the fridge and remove the top piece of parchment. Using a 2-inch round cookie cutter, cut the dough into circles and carefully remove the dough (the dough will be a bit sticky) from the parchment and place on a clean baking sheet lined with parchment paper. Repeat with the remaining dough. Bake for 11 minutes and cool completely.
  6. Melt the chocolate over a double-boiler. Carefully place a cookie in the chocolate and using a fork, turn the cookie over so both sides are coated. Use the fork to lift the cookie out of the chocolate and place on a cooling rack or piece of parchment (I prefer the parchment because when the cookies are completely cooled they will lift off very easily). Repeat with remaining cookies. Cool and store at either room temperature or in the freezer.
  7. Note: I only test the recipes on my site with the listed ingredients and measurements. If you would like to try a substitution, you are welcome to share what you used and how it turned out in the comments below. Thanks!

Did you make this recipe?

Share a photo on Instagram and use the tag #carriekorem — I can't wait to see what you've made!

Posts may contain affiliate links, meaning, at no additional cost to you, I will earn a commission if you click through and make a purchase.

Filed Under: Baking, Cookies, Dairy and Grain-Free Recipes, Dairy-Free Recipes, Desserts, Gluten Free Recipes, Grain Free Recipes, Kids and School Lunches, Paleo Recipes | 30 Comments

Did you enjoy this post?

Sign up for FREE updates!

Receive my "Top 50 Tips to Help Heal Your Thyroid" when you subscribe!

You may also enjoy these posts

Apricot Ice Cream (Grain-Free, Paleo, Gaps)No-Bake Fudgy Chocolate Tarts (Grain-Free, Paleo)Granola Bars (Grain Free, Paleo, Gluten Free, Gaps)

30 Comments

  1. Stephanie Weaver, MPH

    February 2, 2016 at 12:18 pm

    Oh, yum. I am currently on Whole30 and doing another one back to back. I fear that if I made these, all would be lost. Look AMAZING. Thanks for sharing your creativity in grain-free cooking and baking with the world! So glad I met you... 5 years ago! Pinned.
    to Stephanie Weaver, MPH" aria-label="Reply to this comment to Stephanie Weaver, MPH">Reply to this comment
  2. Karin

    February 2, 2016 at 2:10 pm

    These look yummy! My son has a nut allergy. Do you have a recommendation for another flour I can use besides almond? All coconut flour?
    to Karin" aria-label="Reply to this comment to Karin">Reply to this comment
    • Deliciously Organic

      February 2, 2016 at 2:42 pm

      I only test the recipes on my site with the listed ingredients and measurements. If you would like to try a substitution, you are welcome to share what you used and how it turned out in the comments below. Thanks!
      to Deliciously Organic" aria-label="Reply to this comment to Deliciously Organic">Reply to this comment
    • Kathy Kobylarz

      February 27, 2017 at 6:23 pm

      Oat flour
      to Kathy Kobylarz" aria-label="Reply to this comment to Kathy Kobylarz">Reply to this comment
  3. Jennifer

    February 2, 2016 at 2:12 pm

    I can't wait to try these! I only have peppermint extract though - do you have a suggestion for how much I should use instead of the peppermint essential oils? Thank you!
    to Jennifer" aria-label="Reply to this comment to Jennifer">Reply to this comment
    • Deliciously Organic

      February 2, 2016 at 2:41 pm

      I only test the recipes on my site with the listed ingredients and measurements. If you would like to try a substitution, you are welcome to share what you used and how it turned out in the comments below. Thanks!
      to Deliciously Organic" aria-label="Reply to this comment to Deliciously Organic">Reply to this comment
    • Beth

      February 8, 2016 at 3:38 pm

      I made the recipe using peppermint extract. I added 1/2 tsp to the cookie dough and another 1/4 tsp to the melted chocolate for dipping. I was very happy with the mintiness.
      to Beth" aria-label="Reply to this comment to Beth">Reply to this comment
      • Alyssa

        February 10, 2016 at 10:05 pm

        Thank you! I used your subs and also enjoyed them!!
        to Alyssa" aria-label="Reply to this comment to Alyssa">Reply to this comment
        • Karen

          March 12, 2016 at 4:26 pm

          Hi! Do the cookies come out firm/crunchy like real thin mints?
          to Karen" aria-label="Reply to this comment to Karen">Reply to this comment
  4. Dena Norton

    February 2, 2016 at 2:53 pm

    We're currently on the GAPS intro diet at our house, so I'm literally drooling and about to cry thinking of the day when I can make these - Pinning for (much) later! ;)
    to Dena Norton" aria-label="Reply to this comment to Dena Norton">Reply to this comment
  5. Sandra

    February 3, 2016 at 10:26 am

    Sorry if this is a stupid question, but does grain-free also mean they are gluten free? I'm ok with gluten, but would like to make these for a friend who is not. Thanks! They sound wonderful!
    to Sandra" aria-label="Reply to this comment to Sandra">Reply to this comment
    • Deliciously Organic

      February 4, 2016 at 8:01 am

      Yes, it's also gluten-free. :)
      to Deliciously Organic" aria-label="Reply to this comment to Deliciously Organic">Reply to this comment
  6. donna

    February 5, 2016 at 11:33 am

    I'd love to know if there is a way to make these without egg, as my kiddo is allergic.
    to donna" aria-label="Reply to this comment to donna">Reply to this comment
    • Deliciously Organic

      February 7, 2016 at 2:41 pm

      I haven't tested it, but you could try 1 1/4 teaspoons gelatin blended with 3 tablespoons hot water (blend until frothy).
      to Deliciously Organic" aria-label="Reply to this comment to Deliciously Organic">Reply to this comment
  7. Cheyanne

    February 5, 2016 at 6:58 pm

    Yup. It's decided. I need to make these ASAP. Great post, these look amazing!
    to Cheyanne" aria-label="Reply to this comment to Cheyanne">Reply to this comment
  8. Brittany

    February 5, 2016 at 9:17 pm

    My understanding is it's not safe to ingest any essential oil unless under guidance of a trained aromatherapist
    to Brittany" aria-label="Reply to this comment to Brittany">Reply to this comment
    • Deliciously Organic

      February 7, 2016 at 2:39 pm

      The British School says not to ingest because their studies are based on food and perfume grade essential oils. I prescribe to the French School of thought which was put together by medical doctors who's studies are based on therapeutic grade oils. The French school says it's ok to ingest therapeutic grade essential oils (using common sense, of course). Also, peppermint extract (which most use for baking/cooking) contains peppermint essential oil and alcohol. I prefer to skip the alcohol and simply use the essential oil. As an added bonus, the flavor is so much better! :) I should also mention that peppermint oil along with about 30 other essential oils have been designated GRAS by the FDA.
      to Deliciously Organic" aria-label="Reply to this comment to Deliciously Organic">Reply to this comment
      • Carol L

        June 30, 2023 at 10:40 am

        "Therapeutic Grade" is just a marketing ploy used by MLMs and NOT a real thing. There is NO SUCH THING as a 'therapeutic grade' essential oil except for specific essential oil companies, who use it as a marketing aid. Essential oils are VERY strong, and can cause damage to internal organs and the mouth.....you should ALWAYS check with a doctor or perhaps a certified aromatherapist before ingesting ANY essential oils. Nutritionists are NOT doctors. I don't expect this to be posted as it disagrees with Carrie, but her advice for the buttermint recipe with honey for diabetics was horrible. My Blood sugar jumped from low 200 to 400 in one day because I ate them according to advice (1 an hour for 2 weeks) on the blog post.
        to Carol L" aria-label="Reply to this comment to Carol L">Reply to this comment
  9. Alyssa

    February 10, 2016 at 10:04 pm

    I made these tonight, delicious. I had to swap the essential oil for extract and used the suggest amount in the comment above (thanks!). The dough was quite sticky and I only had foil (no parchment) so they stuck to the foil and were not easy to cut out and transfer. I ended up using a extra small spring loaded scoop (probably around 1 Tbsp or just under) and rolled each into a ball. Then I used the bottom of a ramekin dampened with water to flatten to a 2-inch disc (about 1/4 inch). I baked for 11 min, cooled and coated as directed. They came out great! They are really nice from the freezer. Thanks!
    to Alyssa" aria-label="Reply to this comment to Alyssa">Reply to this comment
    • Lynnita

      March 4, 2016 at 5:50 pm

      Were they crispy? I took mine out of the oven and they are more like cake ...not crispy??
      to Lynnita" aria-label="Reply to this comment to Lynnita">Reply to this comment
  10. Molly

    February 20, 2016 at 7:25 pm

    Hi Carrie, I'm a huge fan and have really been loving my weekly meal plans! I found this recipe and decided I HAD to try it. I followed directions exactly including using parchment paper AND chilling dough, however, the dough was so sticky the first time that it got all over the parchment paper and I had to start over. The second time, it still was incredibly sticky and I could not work with it at all. There was no way that I could do anything with it, let alone cut it into a thin cookie shape. I had to scrape all of the dough off of the parchment paper and basically try to roll it in balls (which sort of defeats the whole purpose of a "thin" mint). Not trying to be super negative or look down on your recipe, but PLEASE tell me how you got them into the shape they're in in the picture because I was so discouraged I didn't even finish the cookies, I just gave up :( I really want to give these another try but don't want to waste all the ingredients again so if you could give me a few tips or pointers to make these work better so the dough doesn't stick so badly, that'd be so appreciated. Thanks, Carrie!
    to Molly" aria-label="Reply to this comment to Molly">Reply to this comment
    • Deliciously Organic

      February 29, 2016 at 2:36 pm

      Hmm...I'm not sure what went wrong. Maybe try adding 1 additional tablespoon of coconut flour next time, chill and then cut. Or, try sparkling extra cocoa powder on the parchment when you roll out the dough and then more on top of the dough be for cutting into circles. I also tested these cookies using a small cookie scoop and then pressing them down to make them flat. That worked well, but they were just a tad too thick for my liking...but the kids ate them up!
      to Deliciously Organic" aria-label="Reply to this comment to Deliciously Organic">Reply to this comment
      • Molly

        July 5, 2016 at 9:43 pm

        Thank you, Carrie, I will definitely try that :)
        to Molly" aria-label="Reply to this comment to Molly">Reply to this comment
    • Lynnita

      March 4, 2016 at 5:56 pm

      I added the extra flour as Carrie suggested. Then I did this: in addition to adding cocoa to the parchment paper in the bottom of the pan, I sprinted some on top of the dough before adding the second piece of parchment. Then added it and rolled thin. I refrigerated mine for exactly 30 min, took it out and began cutting. Some of the dough was getting soft so I put that back in the refrigerator for awhile. No problems here and I live in a very humid climate. Hope this helps. I would have left the dough in the refrigerator longer if I needed to but 30 min was sufficient.
      to Lynnita" aria-label="Reply to this comment to Lynnita">Reply to this comment
  11. Lynnita Ellis

    March 4, 2016 at 4:51 pm

    Hi everyone: Thin mints are my absolute fav cookies. After reading some of your challenges I am going to leave my in the fridge @ least 30 minutes, maybe1 hour, like I would do if I were making Christmas Cookies. Also, I will dip my round cutter in almond flr first and divide the dough (which has been Refrigerating)in half before cutting out the cookies. Then I will refrigerate half while I am cutting out the rest(Here in Fl the dough softens up very quickly). Also, I made these w/xylitol. I will sprinkle more cocoa on top of the ones I will cut too. Hope this works. Y'all will surely know if it does. Back with you later.................
    to Lynnita Ellis" aria-label="Reply to this comment to Lynnita Ellis">Reply to this comment
    • Lynnita

      April 15, 2016 at 6:46 pm

      I am back...I made these cookies but added xylitol instead of sugar. They were stupendous!!! I had no problem cutting them w/my round cutter as some had.
      to Lynnita" aria-label="Reply to this comment to Lynnita">Reply to this comment
      • Carol L

        June 30, 2023 at 10:47 am

        Why not roll the dough into a log the size you want (2 inches, or smaller in order to flatten later) and freeze, and cut them in slices...if you can't get them thin enough, just flatten them.
        to Carol L" aria-label="Reply to this comment to Carol L">Reply to this comment
  12. Missy

    March 13, 2016 at 4:03 pm

    Just finishing up my second go round with these...My son and I wanted to experiment with what wasn't just right the first go round. So we left them to chill for 20+min which definitely helped with cutting, etc. Added closer to 13 drops of peppermint oil to the dough and loved the suggestion to add some to the chocolate coating as well. I did as Carrie suggested in the blog post too... cooked them for longer (and rolled them thinner) baking on 325 instead. They're nice and crisp and texture wise more like the originals. This has been a great rainy day activity for us with a rewarding finish. Thanks Carrie!
    to Missy" aria-label="Reply to this comment to Missy">Reply to this comment
    • Deliciously Organic

      March 16, 2016 at 10:04 am

      Glad you all enjoyed them!
      to Deliciously Organic" aria-label="Reply to this comment to Deliciously Organic">Reply to this comment

Trackbacks

  1. Weekend Favorites: 2.12.16 | Ambitious Kitchen says:
    March 24, 2020 at 1:30 pm
    […] Grain free homemade thin mints?! Omg. […]
    to Weekend Favorites: 2.12.16 | Ambitious Kitchen" aria-label="Reply to this comment to Weekend Favorites: 2.12.16 | Ambitious Kitchen">Reply to this comment

Leave a Comment Cancel reply

Your email address will not be published. Required fields are marked *

Recipe rating 5 Stars 4 Stars 3 Stars 2 Stars 1 Star

This site uses Akismet to reduce spam. Learn how your comment data is processed.

Hi, I’m Carrie Korem, FNTP
Welcome to Deliciously Organic

Through unprocessed, organic food and detox I’ve reversed Hashimoto’s disease, chronic migraines, IBS and eczema.

  • Facebook
  • Twitter
  • Instagram
  • Pinterest
  • About
  • Contact
  • Privacy
  • Terms

Subscribe Now & Receive My

Top 50 Tips and Resources to
Support Your Thyroid

Download the List

How I Reversed Hashimoto’s Disease with Diet, Detox and Lifestyle

Grain-Free Family Table Widget

Favorites

20 Steps to Heal From Adrenal Fatigue Naturally

Meat Stock – What to Drink if You Can’t Tolerate Bone Broth

How to Detox After an Amalgam Filling Removal

How to Make and Use Castor Oil Packs

Orange Glazed Salmon Recipe (Grain-Free, Paleo)

  • Home
  • Blog
  • About
  • Shop
  • Contact
  • Privacy Policy
  • Terms of Use

All content copyright © 2025 Deliciously Organic  •  All Rights Reserved  •  Site Design by Emily White Designs